The installation methods of NOKIN solar road studs can be generally divided into two categories, one is flush solar road studs, and the other is embedded solar road studs. One needs to be pasted together with the installation surface with glue, and the other needs to be drilled and injected with glue. According to the production process and materials, the installation methods have their own advantages and disadvantages.
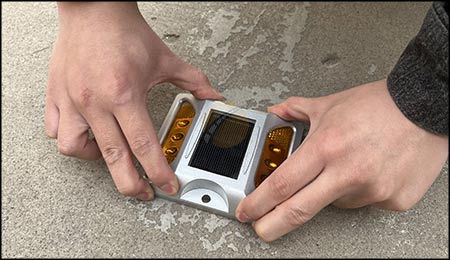
The installation method of flush solar road stud is as follows: Before installing road studs, please set up safety isolation facilities. This is a very important point. During the entire installation process, whether it is a new road or a road that has been opened to traffic, all the installation activities of the safety facilities are carried out by the owner. Determine the installation position of the spike and ensure that the installation position is level. For the road surface with swelling, cracks and unevenness, it should be leveled and leveled in advance. Clean the mounting location with a brush and make sure it is dry. Take an appropriate amount of glue and spread it evenly on the studs. Press the cat's eye road stud firmly on the installation position to ensure the correct direction. If there is too much glue, clean it. If it is a cat's eye solar road stud with nails, please make sure that the depth of the hole is 1cm larger than the depth of the nail, and the diameter of the hole is 2mm larger than the diameter of the nail. If it is a buried solar road stud, be sure to pay attention to the grounding hole, and its size should be appropriate to prevent the bolt from shaking. Conduct inspections within two hours after the led road signs are installed to ensure that all road studs are not upside down, bent, or bent. After the solar road sign is solidified for 6 hours, please remove the safety isolation facilities. The installation of road studs is not a complicated matter, but there are many details that need attention. These details play a very important role in ensuring the quality requirements and service life of road studs.
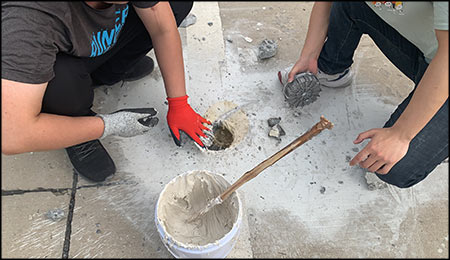
Carefully mark the distances between solar road stud light placements. To prevent adverse effects on the ground, use a suitable tool such as Core Drill. Drill holes 35mm to a depth of 55mm. Remove any debris from the mounting holes. Follow the manufacturer's instructions to pour epoxy into the hole. Make sure the mounting holes are straight. Verify that the mounting holes are large enough to allow the epoxy to surround the solar road stud shaft. Set the illuminated face of the solar road stud to the desired viewing angle. Verify that the epoxy adheres evenly to the mounting holes and the solar marker shaft. Confirm that the bottom of the solar road sign is securely mounted on the mounting surface, allowing zero surface float; (the space between the mounting surface and the bottom of the solar marker). After the LED solar road stud is cured for 6-8 hours, remove the installed isolation facilities. The recommended spacing between each solar spike is as follows: roads and highways 7 - 8 yards (5 - 6 meters) dangerous entry and exit 4 - 5 yards (2 - 3 meters) Access to hospitals, parking lots, etc. 0.5 - 3 yards (0.5 - 2 meters) The spacing between each solar stud is also based on your actual application requirements, the above values are for reference only.
The installation process of solar road studs is not complicated, but you must pay attention to the cleanliness of the road surface and not to use too much glue, and the hole punched by the puncher should not be too large. Only then can vehicles be opened to traffic.